
How to Generate a Roster with IRIS
The Living Roster IRIS workflow
Every new roster period on The Living Roster follows five steps:
Apply Master Roster → Generate with IRIS → Fill Gaps → Roster Health → Publish
| Step | Intelligence Bar action | This guide |
|---|---|---|
| 1 | Apply Master Roster | Summary below — full guide |
| 2 | Generate with IRIS | Detailed below (core IRIS step) |
| 3 | Fill Gaps | Summary below — full guide |
| 4 | Roster Health | How to Use the Roster Health Dashboard |
| 5 | Publish | How to Publish and Unpublish the Living Roster |
All five actions live on The Intelligence Bar at the top of the Living Roster page.
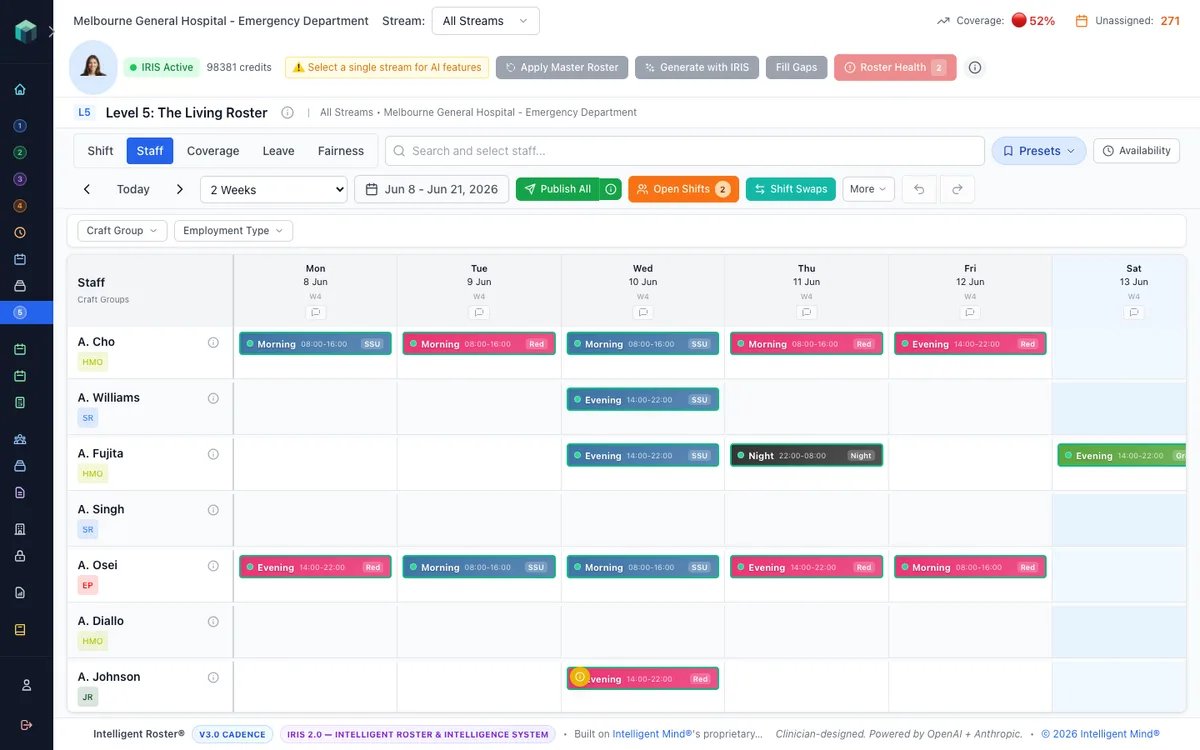
Step 1: Apply Master Roster
Stamp your Level 3 Master Roster patterns onto the live grid before IRIS runs.
- Go to The Living Roster (Sidebar → The Living Roster)
- Select one or more streams from the Intelligence Bar stream picker
- Click Apply Master Roster
- Choose the date range and review the preview
- Click Apply — repeating shift patterns appear as draft assignments on the grid
IRIS generation works best on top of this baseline. Without Apply Master Roster, Generate with IRIS has no pattern foundation to build on.
Full details: How to Apply the Master Roster (Level 3)
Step 2: Generate with IRIS
This is the core IRIS step — it turns your master roster baseline into a balanced, fair living roster for the period.
- Stay on The Living Roster with the same stream selection as step 1
- Click Generate with IRIS in the Intelligence Bar
- In the IRIS Assistant panel, optionally expand Scope this run to narrow the candidate pool — by craft group, employment type, or specific staff ("Only these staff will be considered for this run."). Leave it closed to consider all eligible staff
- Click Generate Roster
When multiple streams are selected, IRIS processes all selected streams in one run (modal header shows "N streams").
Scope this run and open shift requests: narrowing the pool only limits who IRIS rosters. Pending open shift requests from staff outside your filter are left Pending — never auto-declined. Only requesters inside the pool who fail an eligibility rule are declined.
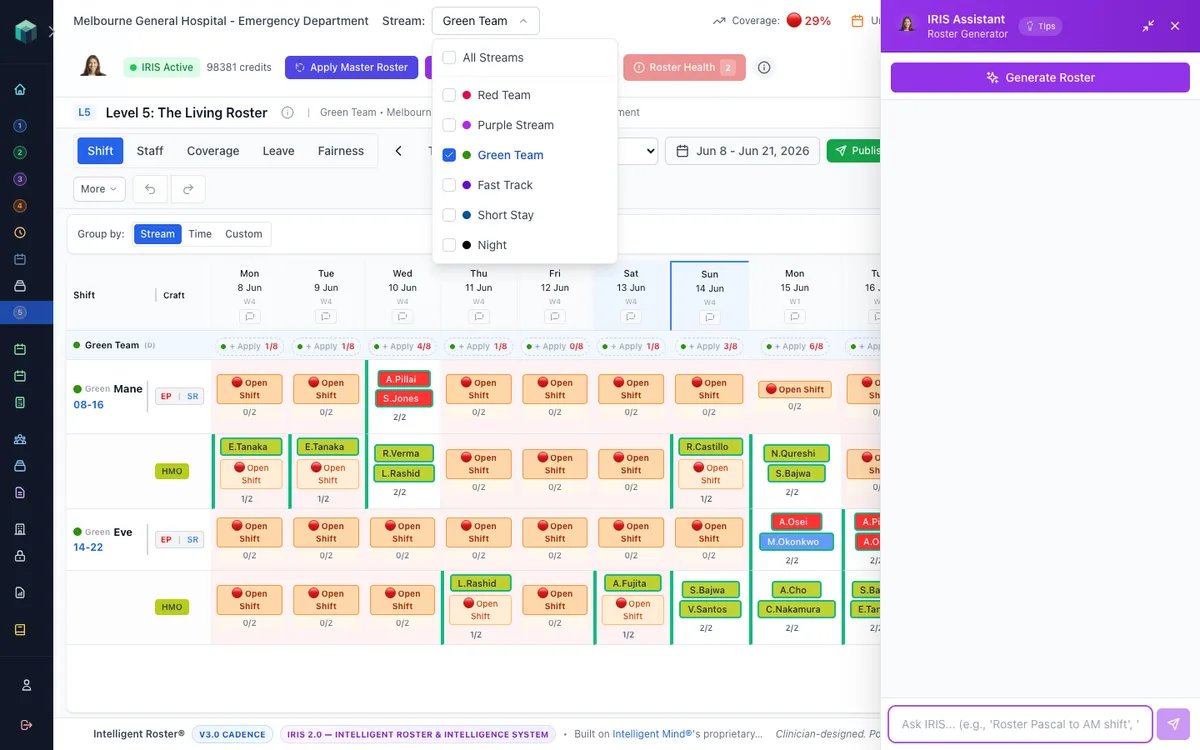
What you'll see during Generate (IRIS 3.0)
With IRIS 3.0, Generate is no longer a silent wait:
- Live narration — the IRIS chat panel shows a thinking rotator describing what IRIS is doing through each fortnight batch (e.g. which stream, which fortnight, progress through the period)
- Fortnight progress — for long periods, status updates show which fortnight batch is running
- End-of-session summary — when Generate finishes, the chat panel summarises in plain language: fill rate, how many staff were rostered, stretch shifts used, rule notes, and unfilled slots with aggregated rejection reasons (e.g. craft-group mismatches vs availability blocks)
- Preview alongside chat — the AI-Generated Roster Preview modal opens to the left of the IRIS chat panel so you can read the session summary while reviewing suggestions. Close or minimise the chat panel and the modal recentres full-screen
The same live narration applies when you trigger Generate from free-text chat (e.g. "roster the AM shift on Monday").
Review the AI-Generated Roster Preview
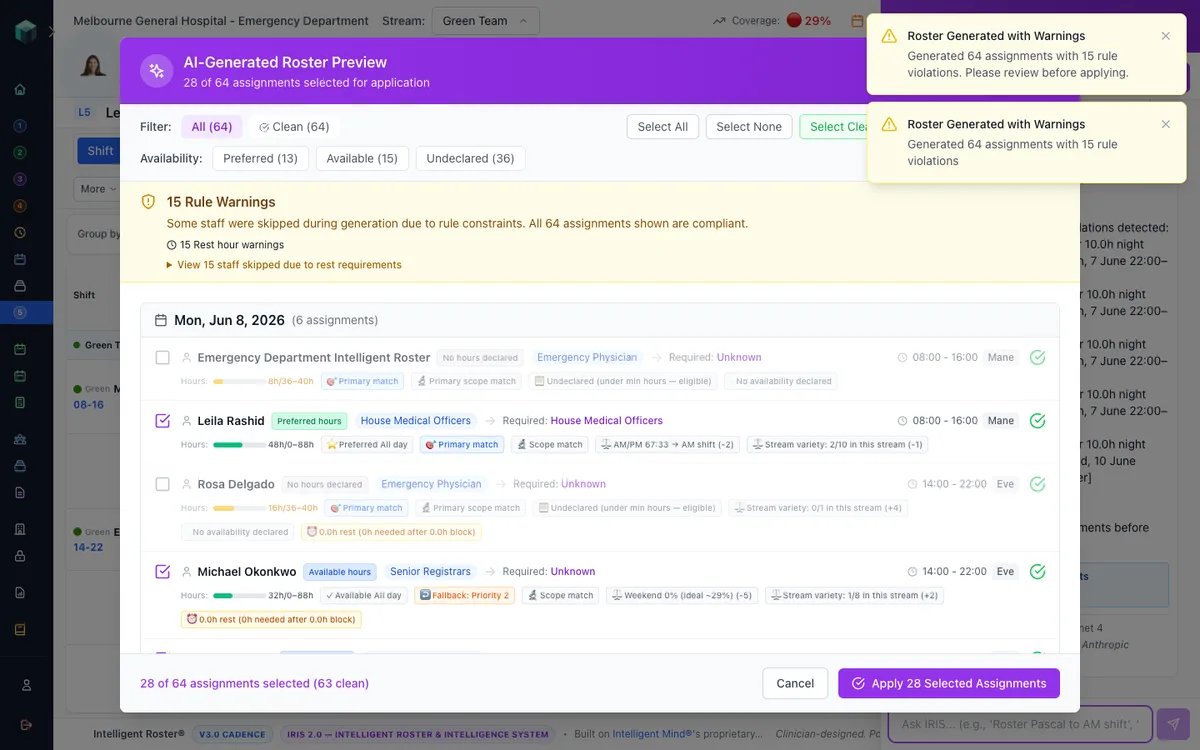
IRIS opens the AI-Generated Roster Preview modal before anything is written to the grid. This is your checkpoint — nothing is applied until you click Apply N Selected Assignments.
Availability tiers
Each suggested assignment is tagged by how the staff member declared My Availability for that date:
| Tier | Badge | Meaning |
|---|---|---|
| Preferred | Preferred hours | Staff marked this day or time as preferred |
| Available | Available hours | Staff marked themselves available (not necessarily preferred) |
| Undeclared | No hours declared | Staff have not set availability for this date in My Availability — IRIS may still suggest them, but they are not auto-selected |
| Blocked | (not shown) | Staff marked themselves unavailable — IRIS never suggests them; they do not appear in the preview |
Use the Availability chips at the top of the preview — Preferred, Available, Undeclared — to filter the list.
What is selected by default
- Preferred and Available assignments with no rule warnings are pre-selected (checked).
- Undeclared assignments are not selected — IRIS requires you to opt in explicitly before rostering someone who has not declared availability.
Choosing what to apply
- Uncheck individual rows — click the checkbox next to any staff member you do not want rostered on that shift.
- Select Preferred Only — apply only staff who marked the time as preferred.
- Select None — clear all selections, then manually check only the rows you want.
- Filter Undeclared — review who IRIS suggested without availability data; leave them unchecked if you do not want to assign undeclared staff in this period.
When you are satisfied, click Apply N Selected Assignments. Only checked rows become purple draft assignments on the Living Roster.
Undo window: After applying IRIS-generated assignments, you can Undo the batch from the preview or grid toolbar for approximately 30 minutes — IRIS registers a soft lock so the entire batch can be reversed in one action. After that window, remove assignments individually or use roster undo for manual edits.
Rule warnings
The preview surfaces compliance warnings (rest hours, consecutive days, craft group mismatches). Use Select Clean Only to apply only assignments with no rule warnings, or review With Issues individually.
Minimum hours fairness
IRIS strongly prioritises staff who are below their contractual minimum when generating assignments — with IRIS 3.0, under-minimum staff who have not yet received a shift in the current batch are scored ahead of staff already at or over their minimum (tier-first fairness). The maximum hours ceiling remains hard — IRIS will not exceed it except in rare cases where shift granularity makes the max unreachable without dropping below minimum. Those cases appear as Tolerated Over Max notes in Roster Health (informational, not violations).
Availability and fairness are always applied during generation — there are no toggles to turn them off.
Hard rules IRIS never breaks
During Generate (and Apply Master Roster / Fill Gaps), IRIS eliminates candidates who fail any of these checks — no score adjustment can override them:
- Approved leave on the date (full leave blocks assignment)
- Time overlap with an existing shift
- Blocked availability — staff who marked themselves unavailable for that window
- Craft group — staff must match the vacancy's craft group (or an OR-group option)
- Scope of practice — staff must hold required scopes per the vacancy's All or Any match setting (Scope of Practice)
- Maximum fortnight hours — hard ceiling (with rare tolerated-over-max exception visible in Roster Health)
- Minimum rest between shifts
Roster builders can still manually override some rules on individual cells (with a recorded reason). IRIS itself will not silently assign out-of-scope or out-of-craft staff.
Long periods and concurrent runs
For date ranges spanning multiple fortnights, IRIS batches the work and shows progress (e.g. "Generating fortnight 2 of 4"). Only one roster generation can run per organisation at a time.
From IRIS Chat
In the same IRIS Assistant panel you can ask in natural language, e.g. "Generate the roster for Green Team this fortnight". When IRIS generates assignments, the same AI-Generated Roster Preview modal opens.
Scope and limits via chat:
- If your organisation has Roster Builder scope enforcement on, chat generation is limited to your permitted streams and craft groups — same as the Intelligence Bar button. See Roster Builder Permissions.
- Chat-triggered generation is capped at 42 days (six weeks) by default. For longer periods, use the Intelligence Bar Generate with IRIS button (fortnight-batched) or split into smaller date ranges.
Open Shift Requests during Generate
When Generate runs, Pending open shift requests for vacancies in the period are evaluated:
- Eligible requesters are strongly prioritised in the engine — many are assigned when IRIS writes the roster (and their request moves to Approved)
- Ineligible requesters may be Declined automatically with a specific reason (unavailable, leave, missing scope, wrong craft group, etc.)
- Staff should check Shift Deck → My Requests after Generate completes
See Understanding Swap and Open Shift Statuses for decline reason examples.
Step 3: Fill Gaps
After step 2, some slots may still be empty — staff on leave, partial availability IRIS skipped, or conservative gaps IRIS left open. Fill Gaps staffs those remaining holes without reshuffling the assignments IRIS already placed.
| Generate with IRIS (step 2) | Fill Gaps (step 3) | |
|---|---|---|
| Scope | Entire period — all vacancies | Only unfilled slots |
| Goal | Balanced roster with fairness optimisation | Coverage first — fill holes tactically |
| When | Every new period, after Apply Master Roster | After Generate, for whatever is still open |
- Click Fill Gaps in the Intelligence Bar (same stream selection as steps 1 and 2)
- Choose a Scope — Current View, 1 Week, 2 Weeks, etc.
- (Optional) Expand Scope this run to narrow the candidate pool
- Click Scan gaps — nothing runs until you click
- Review ranked suggestions by priority tier
- Click Apply Selected
Full details: Fill Gaps — IRIS Tactical Mode
Step 4: Roster Health
Before publishing, run Roster Health to check conflicts, compliance, coverage gaps, and fortnight hours balance (including below-minimum staff and tolerated over-max notes). If Roster Health flags craft-group or scope-of-practice mismatches, use the Resolve tab to remove those unsafe assignments, then refill the opened vacancies with Fill Gaps or manual assignment.
Full details: How to Use the Roster Health Dashboard
Step 5: Publish
When Roster Health looks good, click Publish to release the roster to staff. They will see their shifts in My Shifts and receive notifications.
Full details: How to Publish and Unpublish the Living Roster
Tips
- Set up Vacancy Planning first (Sidebar → Vacancy Planning) — IRIS needs vacancy demand to roster against
- Ask staff to complete My Availability before generating — fewer undeclared rows to review in step 2
- Run all three IRIS steps in order — do not skip Generate with IRIS and jump straight to Fill Gaps
- You are the final decision maker — IRIS suggests; you select and apply